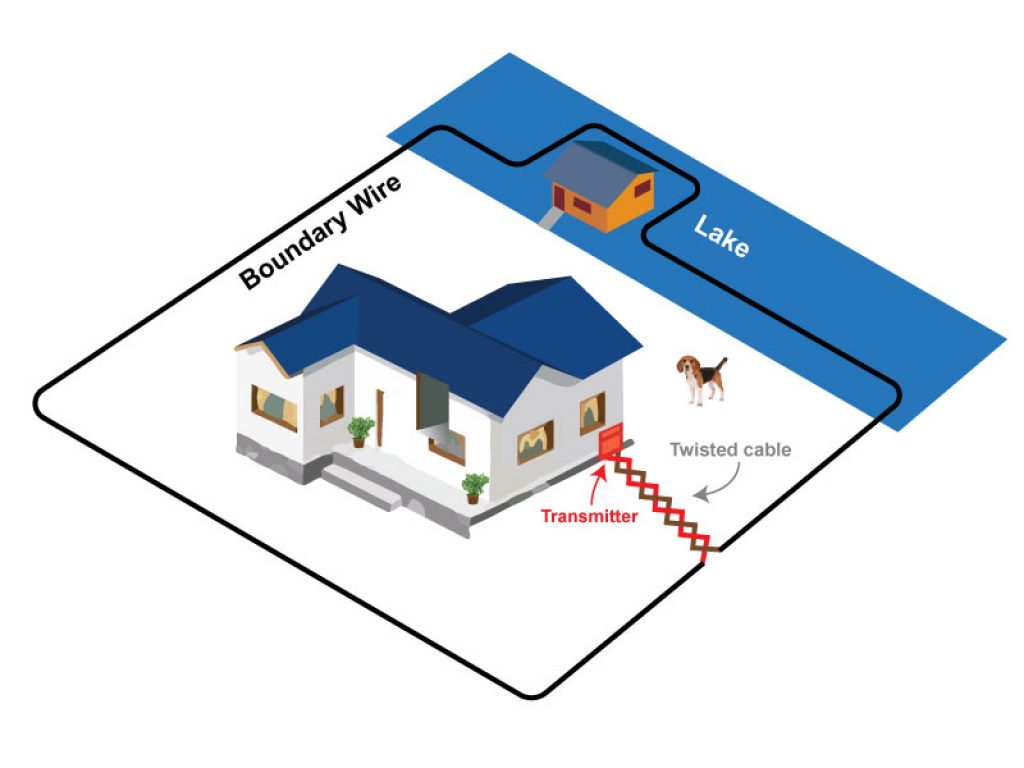
Twisted wire is as simple as it sounds but probably the most misunderstood process of dog fence installation especially when it comes to the ideal position it should be placed. Twisted wires are just two boundary wires twisted together most times to serve as a connector between the boundary and the transmitter.
When the boundary wires are twisted it allows the dog to pass across that area without being corrected or restricted. After placing your boundary fence, it is possible that to connect your wire to the transmitter, the wire might need to pass through the middle of your yard.
Now connecting the wire the way it is to the transmitter would restrict your dog from running all around the yard hence the need to twist the wires. Twisted wires can also be used to connect loops but should not be used as a part of the main loop or else your dog will be able to pass the boundary. Twisting the wires is the best way but not the only way to stop the fence signal. And as you read further into this piece, you will find more. Now let’s go it no more details.
Contents
How To Twist Wire For Dog Fence?
Twisting boundary wires create a signal dead zone that your dog can cross freely. It is possible to purchase already twisted wires for your installation or use a drill to twist the wire. But if you are unable to, twisting the wire by yourself is easy and can be fun actually.
- After you must have placed your boundary wire around the yard, the next thing to do is to connect it to the transmitter which is most likely located inside your house, garage, or basement. Now, this requires that the wire passes through the yard. Connecting both wires to the transmitter like that would make your layout look unorganized and uncomfortable for your dog.
- So, the next thing to do is to place both wires side by side, cut them to the point where they both head towards the transmitter. Using pre-twisted wire is best when the distance between your transmitter and boundary is far. And if that is the case, it requires that you replace the cut boundary wires with the twisted wire at the point where the boundary wires head towards the transmitter.
- Start twisting the wires by twining the wires around each other. Each turn should be one inch for a twist. But be careful not to overdo the twist to prevent damaging the wire.
- After twisting, splice both twisted wires each with their boundary loop. That is, the wire coming from the south to one end of the twisted wire and the wire coming from the north to the other.
- Now with the twisted wires connected with the boundary loop, connect them to the transmitter.
- Switch on your transmitter and voila! Your dog fence is all set
How Do You Connect a Twisted Wire to a Dog Fence?
Whether you are using a pre-twisted wire or you hand twisted the wires yourself, it cannot function if it is not connected to the main loop and transmitter. To connect any of these wires to the main loop, that is the dog fence, splice both ends of the twisted wires to meet the end of the main loop.
Now you might be wondering if you have to cut the wires to splice in the twisted wires, you don’t have to. It only becomes a must to cut the wires when you are using a pre-twisted wire. If not, you can just exchange the positions of the wires by swapping the wire coming from the north to the position of the wire coming from the south and vice versa. Then connect to the transmitter.
Having a dog fence connected to twisted wires and the transmitter is not all you need to safely keep your dog in the yard. Having these things makes the other things easy but there are other things you need to put in place to make them work. This includes having a regulated power supply. It prevents the chances of having signal fluctuations and helps the dog fence work effectively.
Additionally, having a good Frequency modulation (FM) transmitter provides an equal signal at every point of the dog fence and prevents your dog from getting shocked when he is not supposed to.
How Deep Do You Bury Dog Fence Wire?
It is not a must that you bury your dog fence wire but it is essential. This is because while some dog fence wires are built with features that make them suitable for above-ground installations, most are made fragile. When exposed to elements such as water etc, they can easily break. And when wires break, its pieces are hard to find. Leaving the wire unburied could also lead to trip hazards, rodents chewing on it, and pets choking on broken pieces of wire.
After all that has been said, dog fence wires should be buried 3 to 6 inches into the ground. Burying it any deeper than this can result in weak signal strength. And if buried any shallower them this, the wire can easily get exposed especially when it is buried inside the soil and not cement.
Invisible Fence Wiring Diagram
Why Does A Twisted Pair Stop The Signal And When That Won’t Work?
Simply twining a single wire over itself will never stop the signal be it whether you intertwined it or tied it round itself. If you run the wire from a particular point to the fence along another wire and back to that point again, it also will not stop the signal. Your dog will only be allowed to walk along the wire but not across it.
Also, passing the wire through a plastic pipe or even a metal pipe will not stop the signal. Neither will the signal be canceled if you bury it deeper into the ground. Wrapping paper, tape, or anything around each wire will not stop the signal too. If you are thinking cementing the buried wire into the ground can cancel it, you are wrong.
The signal can be canceled by twisting both wires coming from different ends of the boundary loop together. By twinning both wires coming from both sides of the boundary, you manipulate the signal the dog fence exudes thereby allowing your dog a free pass for that area.
The signal can also be stopped when both wires are laid less than 4 feet or closely beside each other in the area you want. Touching both wires neutralizes the power of the wire. But if you want the signal in that area, place both wires 4 ft apart from each other. Twisting wires is a more proper way to stop the signal than laying the wires closely beside each other and letting the dog cross over it. Twisting keeps the wires together and prevents them from separating anytime.
Conclusion:
Inserting a boundary wire becomes unideal when it is placed in an area inside the existing fence or yard because it restricts your dog’s movement and makes it difficult for your dog to roam freely around the compound. So to ensure that your dog has the best time in its yard and roam freely, you need to use a twisted wire.
If you already have a fence in place and you notice that your dog cannot pass through a particular area in the yard, you might need to check the area for untwisted wires. And if there is, hurry up and twist it.
Related Guide:


